There is something special about building something with your own hands, especially when it is for someone you love. Recently, I decided to make a custom RC car for my daughter using an Arduino. The idea was simple, create a fun, interactive toy that she could control from phone, but also make it a project that we could learn from together. I mostly used the components which are already available in my home lab.
The Concept
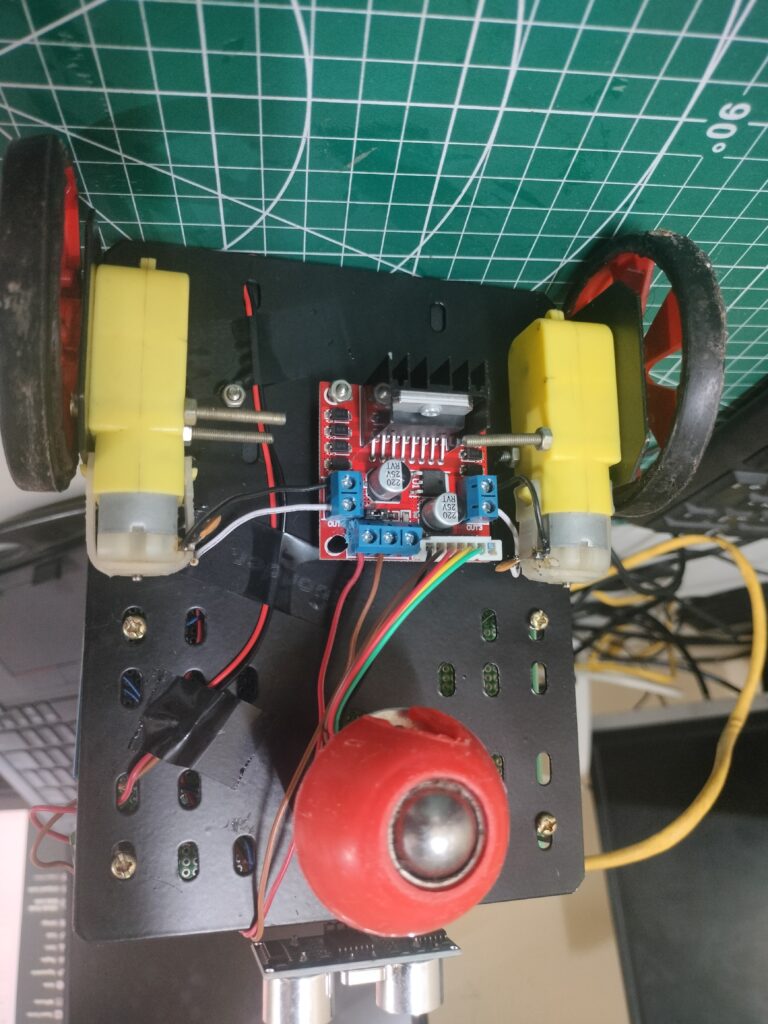
The car is controlled wirelessly through a Bluetooth connection to an Android phone. A custom mobile app sends commands like Forward, Backward, Left, Right, and Stop, along with speed settings. The Arduino reads these commands and drives the motors accordingly. An ultrasonic sensor mounted on the front constantly checks for obstacles, and if something is too close, the car automatically backs up before stopping, checkout images of the project.
The Hardware
Main components used in the build:
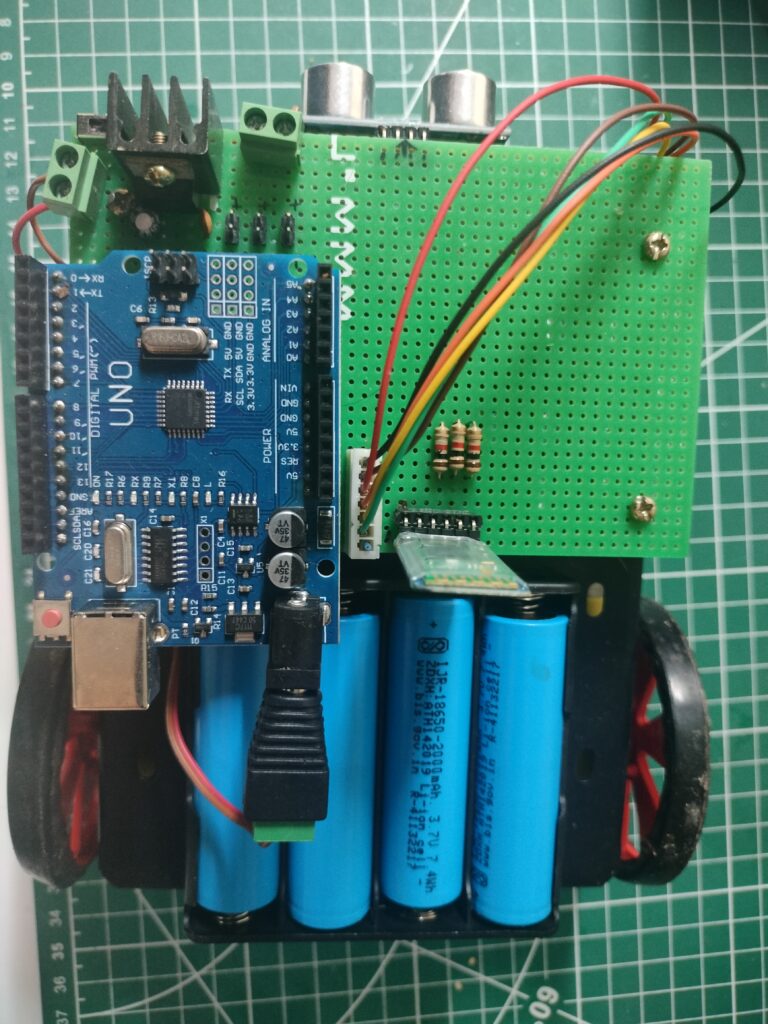
- Arduino Uno : The brain of the car
- HC-05 Bluetooth Module : For wireless control from a smartphone
- L298N Motor Driver : To control the two DC gear motors
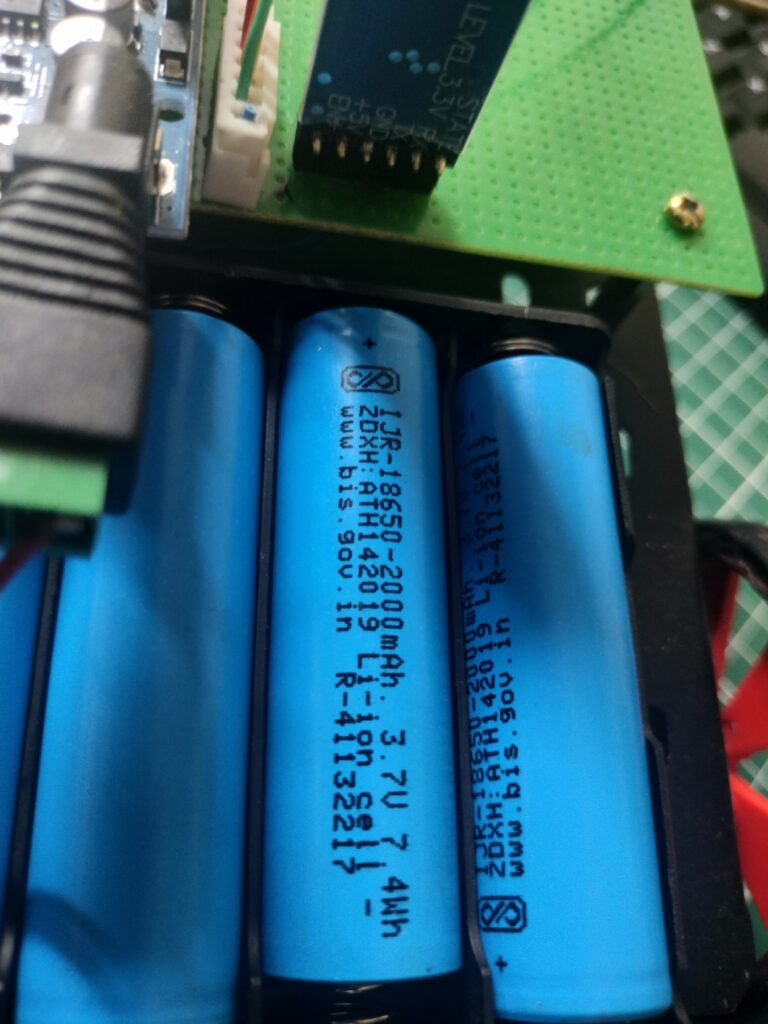
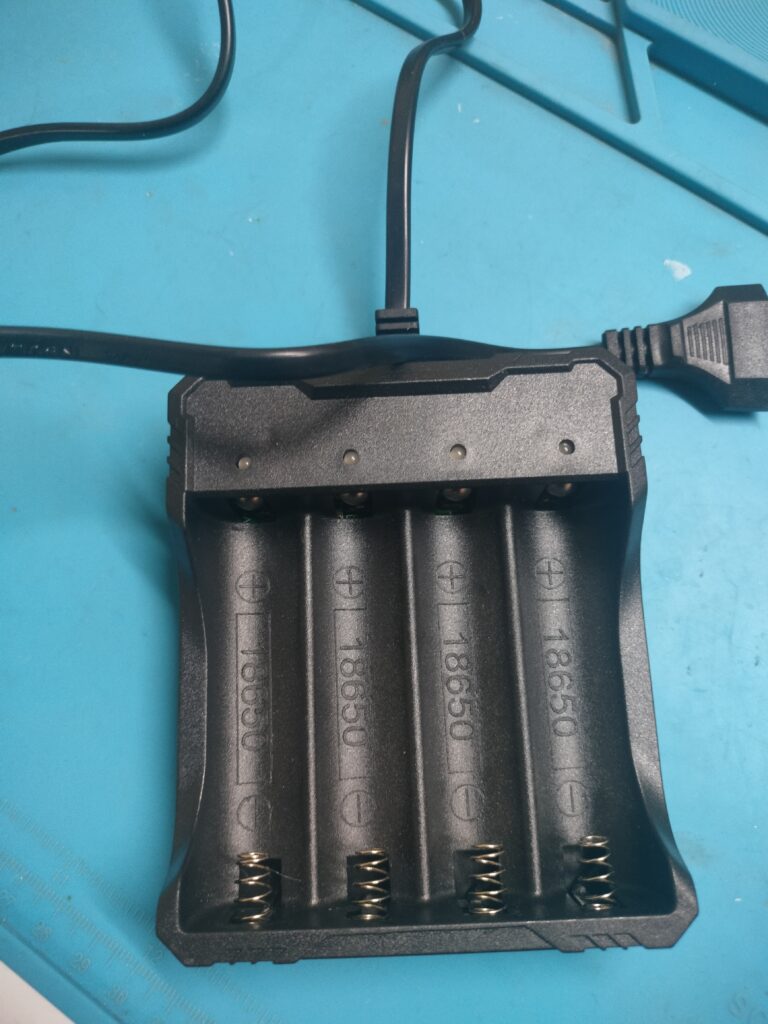
- Four 18650 Li-ion Batteries : Rechargeable power supply
- Battery Holder & Charger : For easy swapping and charging
- HC-SR04 Ultrasonic Sensor : For obstacle detection
- Two DC Gear Motors with Wheels : Provide movement
- Caster Wheel : For balance
- Chassis Plate : To mount everything
The motor driver connects to the two DC motors, while the Arduino sends PWM signals to control speed. The HC-05 Bluetooth module connects to the Arduino to receive commands from the app. The ultrasonic sensor’s trigger and echo pins are connected to the Arduino for real-time distance measurement.
The Software
The Arduino sketch does three main things:
- Read Bluetooth Commands : When a command arrives from the phone, the Arduino interprets it and drives the motors accordingly. Commands like
F,B,L, andRcontrol direction, whileq,3, and1(or H/M/L) change speed. - Control Motor Speed and Direction : PWM pins control how much voltage reaches the motors, giving precise speed control. The L298N driver handles direction switching.
- Obstacle Detection : The ultrasonic sensor continuously checks the distance ahead. If an object is closer than 20 cm, the Arduino tells the car to reverse for a short time and then stop.
#include <SoftwareSerial.h>

// Bluetooth: SoftwareSerial(RX, TX)
SoftwareSerial BTSerial(10, 11);

// Motor A (Left)
const int ENA = 5;
const int IN1 = 8;
const int IN2 = 3;

// Motor B (Right)
const int ENB = 6;
const int IN3 = 4;
const int IN4 = 7;

int speedVal = 150;  // default speed (0–255)

// Ultrasonic HC-SR04
#define TRIG_PIN 9
#define ECHO_PIN 2  // INT0

volatile unsigned long echo_start = 0;
volatile unsigned long echo_end   = 0;
volatile bool echo_done           = false;
volatile bool measuring           = false;

const unsigned long MAX_ECHO_TIME = 30000UL;     // ~5 m
const unsigned long TRIG_INTERVAL = 80000UL;     // 80 ms between pings
unsigned long last_trigger_time   = 0;

// Obstacle handling
bool obstacleDetected = false;
unsigned long obstacleActionStart = 0;
const unsigned long OBSTACLE_ACTION_DURATION = 700; // ms

// Failsafe
unsigned long last_cmd_time = 0;
const unsigned long CMD_TIMEOUT = 3000; // ms

void setup() {
  pinMode(ENA, OUTPUT);
  pinMode(IN1, OUTPUT);
  pinMode(IN2, OUTPUT);

  pinMode(ENB, OUTPUT);
  pinMode(IN3, OUTPUT);
  pinMode(IN4, OUTPUT);

  setSpeed();  // apply default PWM

  BTSerial.begin(9600);

  pinMode(TRIG_PIN, OUTPUT);
  pinMode(ECHO_PIN, INPUT);
  attachInterrupt(digitalPinToInterrupt(ECHO_PIN), echoISR, CHANGE);

  last_cmd_time = millis();
}

void loop() {
  unsigned long now = millis();
  unsigned long us  = micros();

  // Bluetooth command handling
  if (BTSerial.available()) {
    char cmd = BTSerial.read();
    last_cmd_time = now;

    if (!obstacleDetected) {
      switch (cmd) {
        // Movement
        case 'F': moveForward();           break;
        case 'B': moveBackward();          break;
        case 'L': turnLeft();              break;
        case 'R': turnRight();             break;
        case 'S': stopMotors();            break;

        // Speed: legacy keys
        case 'q': speedVal = 255; setSpeed(); break; // high
        case '3': speedVal = 180; setSpeed(); break; // medium
        case '1': speedVal = 100; setSpeed(); break; // low

        // Speed: human-friendly keys (upper/lower)
        case 'H': case 'h': speedVal = 255; setSpeed(); break;
        case 'M': case 'm': speedVal = 180; setSpeed(); break;
        case 'W': case 'w': // "low" without colliding with 'L' turn
        case 'L': /* reserved for Left turn */ break;
        case 'O': case 'o': speedVal = 100; setSpeed(); break; // think "low" -> "low power"
      }
    }
  }

  // Failsafe stop if control link silent
  if (!obstacleDetected && (now - last_cmd_time > CMD_TIMEOUT)) {
    stopMotors();
  }

  // Periodic ultrasonic trigger
  if (!measuring && (us - last_trigger_time >= TRIG_INTERVAL)) {
    sendTriggerPulse();
    last_trigger_time = us;
  }

  // Handle completed ultrasonic measurement
  if (echo_done) {
    echo_done = false;
    unsigned long duration = echo_end - echo_start;

    if (duration > 10 && duration < MAX_ECHO_TIME) {
      float distance_cm = duration * 0.0343f / 2.0f;

      if (distance_cm < 20.0f && !obstacleDetected) {
        // brief reverse, then stop
        moveBackward();
        obstacleDetected = true;
        obstacleActionStart = now;
      }
    }
  }

  // End of obstacle action
  if (obstacleDetected && (now - obstacleActionStart >= OBSTACLE_ACTION_DURATION)) {
    stopMotors();
    obstacleDetected = false;
  }

  // Ultrasonic timeout
  if (measuring && (us - echo_start > MAX_ECHO_TIME)) {
    measuring = false;
    echo_done = true;
    echo_end = echo_start + MAX_ECHO_TIME;
  }
}

// Movement
void moveForward() {
  digitalWrite(IN1, LOW);  digitalWrite(IN2, HIGH);
  digitalWrite(IN3, HIGH); digitalWrite(IN4, LOW);
}

void moveBackward() {
  digitalWrite(IN1, HIGH); digitalWrite(IN2, LOW);
  digitalWrite(IN3, LOW);  digitalWrite(IN4, HIGH);
}

void turnLeft() {
  digitalWrite(IN1, LOW);  digitalWrite(IN2, HIGH);
  digitalWrite(IN3, LOW);  digitalWrite(IN4, HIGH);
}

void turnRight() {
  digitalWrite(IN1, HIGH); digitalWrite(IN2, LOW);
  digitalWrite(IN3, HIGH); digitalWrite(IN4, LOW);
}

void stopMotors() {
  digitalWrite(IN1, LOW); digitalWrite(IN2, LOW);
  digitalWrite(IN3, LOW); digitalWrite(IN4, LOW);
}

void setSpeed() {
  analogWrite(ENA, speedVal);
  analogWrite(ENB, speedVal);
}

// Ultrasonic
void sendTriggerPulse() {
  measuring = false;
  digitalWrite(TRIG_PIN, LOW);
  delayMicroseconds(2);
  digitalWrite(TRIG_PIN, HIGH);
  delayMicroseconds(10);
  digitalWrite(TRIG_PIN, LOW);
}

void echoISR() {
  if (digitalRead(ECHO_PIN) == HIGH) {
    echo_start = micros();
    measuring = true;
  } else {
    echo_end = micros();
    measuring = false;
    echo_done = true;
  }
}
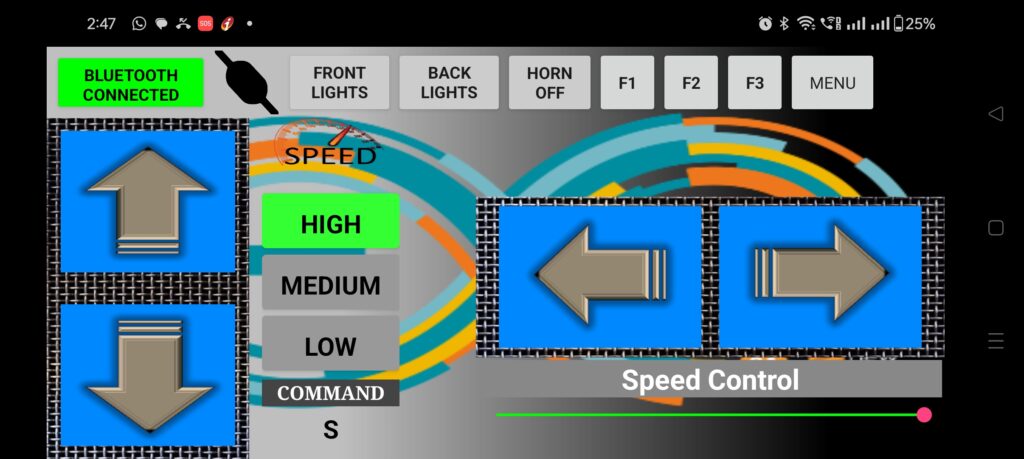
The Mobile App
I used this app for controlling the car, see the screen shot of the app below.
Conclusion
In the end everything came together perfectly. The car worked just as I had imagined and my daughter absolutely loves driving it around. Seeing her excitement made all the effort worthwhile.
Even though this is a relatively simple project on paper I quickly realised that building something from scratch is never without its challenges. There were moments when I had to troubleshoot stubborn connections, tweak the code repeatedly and recheck the wiring just to figure out why a motor was not moving. At times I found myself thinking, “Why is this tiny thing giving me such a hard time?” and then laughing it off when I finally got it working.
But that is the beauty of making things. Every hiccup teaches you something new and every small success keeps you motivated to push forward. In the end the joy of watching my daughter race the car around the room erased all the little frustrations along the way.
This project reminded me that no matter how simple something seems, creating it with your own hands is a journey full of learning, patience and the occasional ha ha ha moment. And that is exactly what makes it so satisfying.